create iam group and user
- 사용자 그룹(Pipeliner) 생성
- 사용자(cicd-user) 생성
- IAM(cicd-user) 유저로 로그인
- MFA(6자리 OTP) 세팅
- default VPC 생성
- 기본 VPC를 생성하면 인터넷 연결 가능한 서브넷까지 함께 구성됩니다.
- EC2(vmware같은 가상머신, code-service) 인스턴스 생성
- SSH 접근을 위해 키페어(labkey) 생성 (권한 문제를 피하려면 홈 디렉터리에 저장 권장)
- 보안그룹(Code Server Security Group) 생성
- 설명: Permit ssh and code-server port 8443, 5173
- 5173은 로컬 개발 서버(vite dev) 확인용 포트
- 스토리지: 프리티어 30GB 권장
- 고급 세부 정보 → 사용자 데이터(User Data) 스크립트 입력
1
2
3
4
5
6
7
8
9
10
11
12
13
14
15
16
17
18
19
20
21
22
23
24
25
26
27
28
29
30
31
32
33
34
35
36
37
38
39
40
41
42
43
44
45
46
47
48
49
| #!/bin/bash
set -eux
# 1. 시스템 패키지 업데이트 및 필수 도구 설치
apt update && apt upgrade -y
apt install -y curl git build-essential
# 2. code-server 설치 (tar.gz 다운로드 방식)
CODE_SERVER_VERSION="4.103.2"
curl -fsSL "https://github.com/coder/code-server/releases/download/v${CODE_SERVER_VERSION}/code-server-${CODE_SERVER_VERSION}-linux-amd64.tar.gz" -o /tmp/code-server.tar.gz
mkdir -p /opt/code-server
tar -xzf /tmp/code-server.tar.gz -C /opt/code-server --strip-components=1
ln -sf /opt/code-server/bin/code-server /usr/bin/code-server
# 3. ubuntu 사용자용 설정 디렉토리 생성 및 설정
mkdir -p /home/ubuntu/.config/code-server
cat <<'EOF' > /home/ubuntu/.config/code-server/config.yaml
bind-addr: 0.0.0.0:8443
auth: password
password: YourStrongPassword123 # 원하는 비밀번호로 변경 가능
cert: false
EOF
chown -R ubuntu:ubuntu /home/ubuntu/.config
# 4. systemd 서비스 파일 등록 (system-wide, root에서 관리)
cat <<EOF > /etc/systemd/system/code-server.service
[Unit]
Description=code-server (VSCode Web IDE)
After=network.target
[Service]
Type=simple
User=ubuntu
Environment=HOME=/home/ubuntu
WorkingDirectory=/home/ubuntu
ExecStart=/usr/bin/code-server
Restart=always
[Install]
WantedBy=multi-user.target
EOF
# 5. 서비스 실행 및 부팅 시 자동 실행 설정
systemctl daemon-reload
systemctl enable --now code-server
|
- SSH 접속 후 hostname 변경
1
2
3
4
| sudo hostnamectl set-hostname code-server
exit
ssh -i ~/works/certs/labkey.pem ubuntu@<EC2_PUBLIC_IP>
# 재접속 시 프롬프트: ubuntu@code-server:~$
|
- Public IP:8443 으로 접속하면 code-server 로그인 화면이 보입니다. 위
config.yaml의 비밀번호로 로그인해 VS Code Web 환경을 사용합니다.
ci/cd setup
- GitHub Personal Access Token(classic) 생성
- 권한:
repo, workflow, admin:repo_hook
- code-server에서 Git 설정
1
2
3
4
| git config --global credential.helper store
git config --global credential.UseHttpPath true # 대소문자에 주의
git config --global user.name "eun2ce"
git config --global user.email "joeun2ce@gmail.com"
|
- 신규 repo 및 테스트 파일 생성
1
2
3
4
5
6
7
8
9
| mkdir -p ~/cicd/my-first-repo && cd ~/cicd/my-first-repo
git init
git branch -m main
echo "<h1> hello, git</h1>" > index.html
git add index.html
git commit -m "feat: add hello page"
# GitHub에 빈 리포지토리(eun2ce/my-first-repo)를 먼저 만든 뒤 origin 추가
git remote add origin https://github.com/eun2ce/my-first-repo.git
git push -u origin main
|
- GitHub ↔ VS Code(code-server) 연동
- 최초 push 시 나오는 팝업에서 GitHub 인증을 연결하면 이후에는 토큰/비번 입력 없이 push가 가능합니다.
aws codebuild
완전관리형 빌드 서비스로, 빌드 시점에만 서버가 기동되고 종료됩니다. 사용량 기반 과금.
1) Node & Vue 템플릿 준비
1
2
3
4
5
6
7
8
9
10
11
12
13
14
15
| # LTS 설치
curl -o- https://raw.githubusercontent.com/nvm-sh/nvm/v0.39.7/install.sh | bash
source ~/.bashrc
nvm install 22
nvm use 22
nvm alias default 22
# Vite(Vue) 앱 생성
cd ~/cicd
npm create vite@latest my-vue-repo
cd my-vue-repo
npm install
# 개발 서버 확인
npm run dev -- --host # http://<EC2_PRIVATE_IP>:5173/
|
2) 프로덕션 빌드
1
2
3
| cd ~/cicd/my-vue-repo
npm run build
ls dist/
|
3) S3 정적 웹 호스팅
- 버킷 생성 → 정적 웹 사이트 호스팅 활성화(index.html)
- 퍼블릭 액세스 차단 해제(실습용), 버킷 정책 적용
1
2
3
4
5
6
7
8
9
10
| {
"Version": "2012-10-17",
"Statement": [{
"Sid": "PublicReadGetObject",
"Effect": "Allow",
"Principal": "*",
"Action": ["s3:GetObject"],
"Resource": ["arn:aws:s3:::vue-website-<랜덤버킷명>/*"]
}]
}
|
4) buildspec.yml
1
2
3
4
5
6
7
8
9
10
11
12
13
14
15
16
17
| version: 0.2
phases:
install:
runtime-versions:
nodejs: 22
commands:
- node -v
- npm -v
pre_build:
commands:
- npm install
build:
commands:
- npm run build
post_build:
commands:
- aws s3 sync ./dist s3://vue-website-<랜덤버킷명> --delete
|
첫 빌드가 S3 권한 부족으로 실패하면 CodeBuild 서비스 롤에 S3 읽기/쓰기 권한을 부여 후 재시도하세요(실습에서는 관리자형 권한 사용 가능, 실무는 최소권한 원칙).
aws codedeploy (선택)
EC2에 Nginx로 정적 파일을 서빙하고 싶다면 CodeDeploy 구성을 추가합니다.
1) CodeDeploy Agent 설치 (User Data 예시)
1
2
3
4
5
6
7
8
9
10
11
| #!/bin/bash
yum update -y
yum install -y ruby wget
CODEDEPLOY_BIN="/opt/codedeploy-agent/bin/codedeploy-agent"
$CODEDEPLOY_BIN stop || true
yum erase codedeploy-agent -y || true
cd /home/ec2-user/
wget https://aws-codedeploy-ap-northeast-2.s3.ap-northeast-2.amazonaws.com/latest/install
chmod +x ./install
./install auto
systemctl start codedeploy-agent
|
1
2
3
4
5
6
7
8
| #!/bin/bash
apt update -y
apt install -y ruby-full wget
cd /home/ubuntu/
wget https://aws-codedeploy-ap-northeast-2.s3.ap-northeast-2.amazonaws.com/latest/install
chmod +x ./install
./install auto
systemctl start codedeploy-agent
|
2) EC2 인스턴스 프로파일 권한(실습 예시)
1
2
3
4
5
6
7
8
| {
"Version": "2012-10-17",
"Statement": [{
"Action": ["s3:Get*", "s3:List*"],
"Effect": "Allow",
"Resource": "*"
}]
}
|
3) appspec.yml & 스크립트
1
2
3
4
5
6
7
8
9
10
11
12
13
14
15
16
17
18
19
20
21
| # appspec.yml
version: 0.0
os: linux
files:
- source: dist
destination: /var/www/html
hooks:
BeforeInstall:
- location: scripts/install_dependencies.sh
timeout: 300
runas: root
ApplicationStart:
- location: scripts/start_server.sh
timeout: 300
runas: root
ApplicationStop:
- location: scripts/stop_server.sh
timeout: 300
runas: root
ValidateService:
- location: scripts/basic_health_check.sh
|
1
2
3
4
| # scripts/install_dependencies.sh
#!/bin/bash
apt update -y || true
apt install -y nginx
|
1
2
3
| # scripts/start_server.sh
#!/bin/bash
service nginx start
|
1
2
3
4
5
6
| # scripts/stop_server.sh
#!/bin/bash
isExistApp=$(pgrep nginx || true)
if [[ -n "$isExistApp" ]]; then
service nginx stop
fi
|
1
2
3
4
5
6
7
8
9
10
11
12
13
| # scripts/basic_health_check.sh
#!/bin/bash
for i in {1..10}; do
HTTP_CODE=$(curl --write-out '%{http_code}' -o /dev/null -m 10 -s http://localhost:80)
if [ "$HTTP_CODE" = "200" ]; then
echo "Successfully pulled root page."
exit 0
fi
echo "HTTP $HTTP_CODE. retrying..."
sleep 10
done
echo "Server did not come up after expected time. Failing."
exit 1
|
aws codepipeline (GitHub → CodeBuild → (선택) CodeDeploy)
- Connections에서 GitHub App 연결 생성(예:
github-connection-for-learn-cicd) - Source: GitHub
main 브랜치 - Build: 위 CodeBuild 프로젝트 선택(이미지 최신/Buildspec 파일 사용)
- (옵션) Deploy: CodeDeploy 애플리케이션/배포그룹 지정
다이어그램
GitHub → CodeBuild → (S3 | CodeDeploy→EC2) 흐름도
S3 정적 웹 호스팅 접근 경로
트러블슈팅 체크리스트
- CodeBuild 실패(AccessDenied: S3) → CodeBuild 서비스 롤 권한 점검
- code-server 접속 불가 → 보안그룹에 8443 인바운드, User Data 재검토
- Nginx 검증 실패 →
/var/www/html 권한/경로, health check 스크립트 HTTP 코드 확인
마무리
이번 실습을 통해 GitHub 커밋 한 번으로 빌드와 배포가 자동화되는 파이프라인을 구성했습니다.
실습에서는 단순화를 위해 권한을 넉넉히 주었지만, 실무에서는 최소 권한 원칙(Least Privilege) 으로 IAM 정책을 구성하시길 권장합니다.
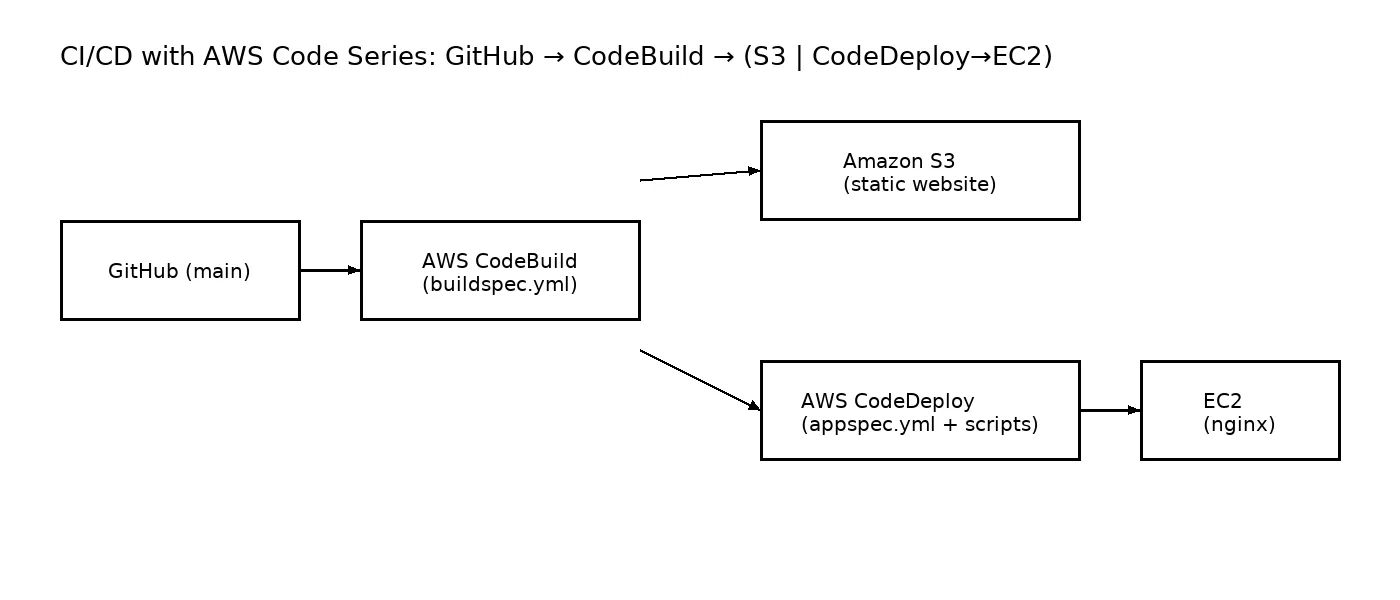 GitHub → CodeBuild → (S3 | CodeDeploy→EC2) 흐름도
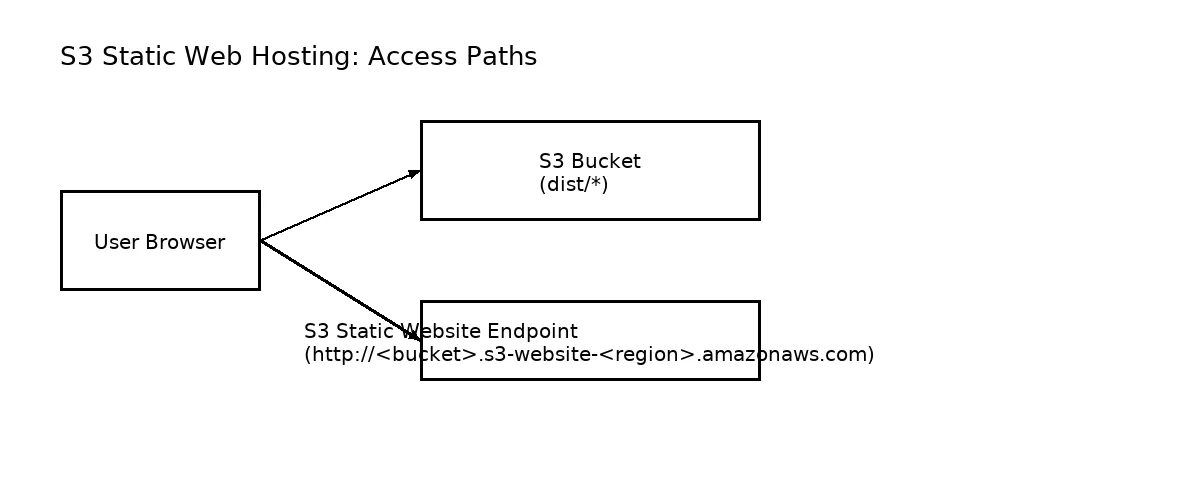 S3 정적 웹 호스팅 접근 경로