[멋쟁이사자처럼 백엔드 스쿨] Java 프로그래밍 기초
수업한 내용들을 기록하지만 개인적으로 요약정리 한 내용들이 포함되어있을 수 있습니다.
java, git 설치
자바 버전을 스위칭 하면서 쓰고싶다면 아래 글을 참고한다.
2024.12.02 - [개발] - [java] 자바 버전 변경하는 방법
java의 실행 방식
java 컴파일러 javac명령으로 Hello.java 를 컴파일
1
2
3
4
5
6
$ cat Hello.java
public class Hello {
	public static void main(String[] args){
		System.out.print("hello world");
	}
}
Hello.class 파일 생성
- class 파일은 컴퓨터가 이해할 수 있는 상태로 바꾼 것 (compile)
- JVM(java)이 OS에 설치되어 있다는 전제하에 컴퓨터가 이해
1
2
3
4
$ javac Hello.java
$ ls -al
-rw-r--r--@ 1 xxx  xxx  407 12  3 11:07 Hello.class // 생성된 것을 알 수 있음
-rw-r--r--@ 1 xxx  xxx  108 12  2 14:31 Hello.java
jvm 으로 Hello.class 를 실행
1
2
$ java Hello
hello world
자바 기초
1
2
3
4
5
class Main {
  public static void main(String[] args) {
    System.out.println("Hello World");
  }
}
public static void main
- main 은 프로그램의 시작점
- public: 접근 제한자
- static: 컴파일 타임에 생성
- void: 리턴 타입
- main: 메소드 명
에디터에서
psvm단축어로 빠르게 생성 가능
System.out: 표준출력 (stdout)
System.out.println() ?
System클래스 속out이라는PrintStream클래스 타입의 변수에게PrintStream클래스 속에있는println메소드라는 의미
.의 의미: of 와 동일- println(): 출력 끝에 줄바꿈
Class 와 Instance 그리고 static 키워드
1
2
3
4
5
6
7
8
9
10
11
12
13
public class Hello {
  String name = "this is name";
  static String staticName = "this is static name";

  public static void main(String[] args) {
    System.out.print("hello world");
    System.out.print(name); // 사용 불가능
    Hello h = new Hello(); // Hello 라는 클래스의 h 인스턴스를 생성 (실체를 만든다 정도)
    System.out.println(h.name);
    // 그러나 static 으로 선언 된 경우 컴파일 타임에 생성되기 때문에 사용 가능
    System.out.print(staticName);
  }
}
주석
주석이 달린 부분은 컴파일에 영향을 미치지 않는다.
// 한줄주석
일반적인 설명을 달 때
1
2
3
4
5
public class Exam {
  public static void main(String[] args) {
    //System.out.pirnt("hello");
  }
}
/* */ 여러 라인 주석
특정 부분을 사용하고 싶지 않을 때
1
2
3
4
5
6
7
/*
public class Exam {
    public static void main(String[] args) {
        //System.out.pirnt("hello");
    }
}
*/
/** */ custom api 제작 주석
코드와 문서를 포함한 개발자의 예제파일 및 문서화에 이용 (javadoc)
1
2
3
4
5
6
7
8
9
10
11
12
13
package day01;

/**
 * java 주석 테스트 클래스
 *
 * @author eun2ce
 * @since 2024.12.02
 */
public class DocTest {
  public static void main(String[] args) {
    System.out.println("주석 테스트");
  }
}
접근 제어자
접근 제어자는 private < default < protected < public 순으로 보다 많은 접근을 허용
| 제어자 | 같은 클래스 | 같은 패키지 | 자손 클래스 | 전체 |
|---|---|---|---|---|
| private | o | |||
| default | o | o | ||
| protected | o | o | o | |
| public | o | o | o | o |
패키지
클래스의 묶음
변수
1
int i = 1;
메모리상의 표현
| 1byte | 2byte | 3byte | 4byte |
|---|---|---|---|
| 00000000 | 00000000 | 00000000 | 00000001 |
타입
primitive type (기본형 타입)
- 실제 값을 stack 메모리에 저장
| 타입 | 할당되는 메모리 크기 | 기본값 | 데이터의 표현 범위 | |
|---|---|---|---|---|
| 논리형 | boolean | 1 byte | false | true, false |
| 정수형 | byte | 1 byte | 0 | -128 ~ 127 |
| short | 2 byte | 0 | -32,768 ~ 32,767 | |
| int(기본) | 4 byte | 0 | -2,147,483,648 ~ 2,147,483,647 | |
| long | 8 byte | 0L | -9,223,372,036,854,775,808 ~ 9,223,372,036,854,775,807 | |
| 실수형 | float | 4 byte | 0.0F | (3.4 X 10-38) ~ (3.4 X 1038) 의 근사값 |
| double(기본) | 8 byte | 0.0 | (1.7 X 10-308) ~ (1.7 X 10308) 의 근사값 | |
| 문자형 | char | 2 byte (유니코드) | ‘\u0000’ | 0 ~ 65,535 |
reference type (참조형 타입)
- 기본형 타입을 제외한 모든 타입
| 타입 | 예시 | 기본값 | 할당되는 메모리 크기 |
|---|---|---|---|
| 배열(Array) | int[] arr = new int[5]; | Null | 4 byte (객체의 주소값) |
| 열거(Enumeration) | Null | ||
| 클래스(Class) | String str = “test”; Student sujin = new Student(); | Null | |
| 인터페이스(Interface) | Null |
주의할 점
- 정수타입을 사용 할 경우 오버/언더플로우 주의
- 실수타입 사용시 유효 자릿수 고려
- 정확한 계산이 필요한 경우 - int, long 정수형 타입을 사용하거나 BigDecimal 클래스를 이용
연산자
연산자와 연산자 우선순위를 표로 정리 굳이 외울 필요는 없고, 연산자에도 우선순위가 있다고 인지 할 것
| 종류 | 분류 | 연산자 | 연산방향 | 우선순위 |
|---|---|---|---|---|
| 단항 | 전위 | a++ a– | ← | 높음 |
| 후위 | ++a –a +a -a ~ ! (자료형) | ← | ||
| 산술 | 곱셈 | * / % | → | |
| 덧셈 | + - | → | ||
| 시프트 | 시프트 | 《 》 》》 | → | |
| 관계 | 비교 | 〈 〉 <= >= instanceof | → | |
| 동등 | == != | → | ||
| 비트 | AND | & | → | |
| XOR | ^ | → | ||
| OR | | | → | ||
| 논리 | AND | && | → | |
| OR | || | → | ||
| 삼항 | 삼항 | ?: | ← | |
| 대입 | 대입 | = += -= *= /= %= &= ^= | = 《= 》= 》》= | ← | 낮음 |
형 변환
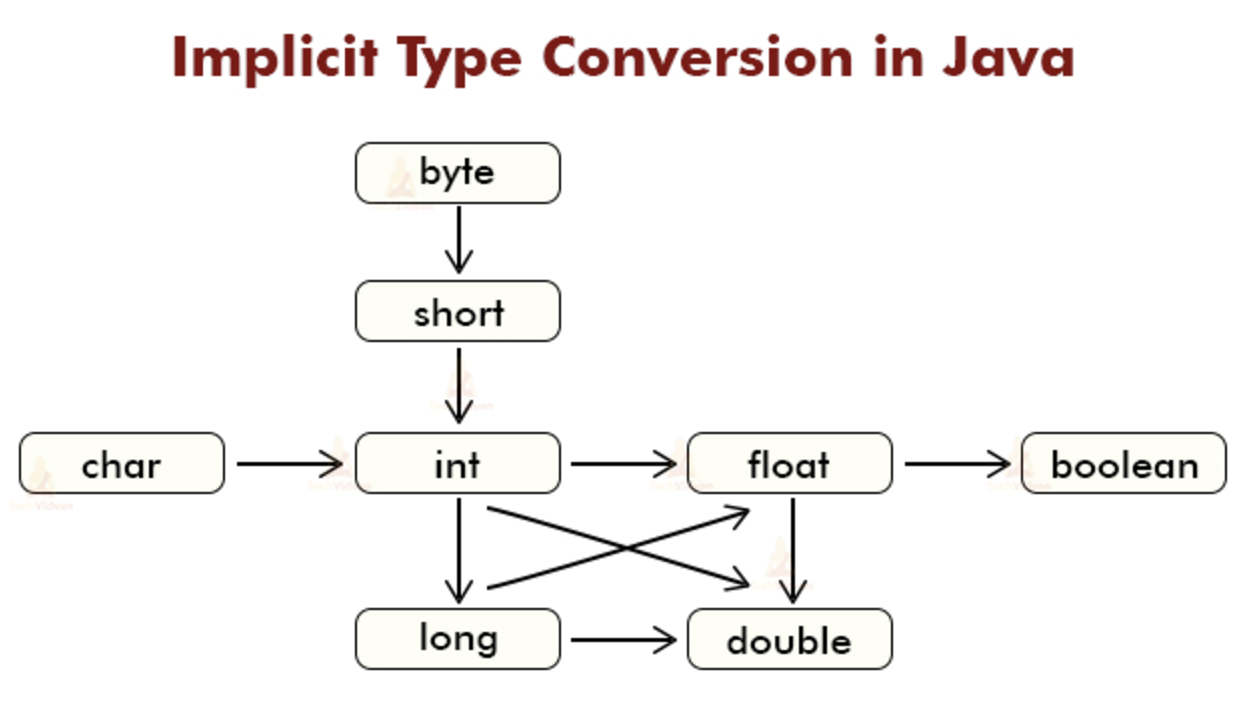
java 형 변환에 대해 자세한 내용이 궁금하시면, 이 글을 참고해주세요.
조건문
특정 조건을 만족할 때 실행
if
조건식의 결과는 true or false
true 일 때 실행
1
2
3
4
5
6
7
8
9
10
11
public class Exam {
  public static void main(String[] args) {
    if (num % 2 == 0) {
      System.out.printf("짝수");
    } else if (num % 3 == 0) {
      System.out.printf("3의 배수");
    } else {
      System.out.printf("홀수");
    }
  }
}
switch
기본 switch 구문
switch 구문은 break를 적절히 걸어주지 않으면 하위 case 문으로 넘어가기 때문에 반드시 주의할 것
1
2
3
4
5
6
7
8
9
10
11
12
13
14
15
16
17
18
19
20
public class Main {
  public static void main(String[] args) {
    int num = 2;

    switch (num) {
      case 1:
        System.out.println("case 1");
        break; // 걸어주지 않으면 하위 케이스도 전부 출력
      case 2:
        System.out.println("case 2");
        // break;
      case 3:
        System.out.println("case 3");
        break;
      default: // optional
        System.out.println("nothing");
        break;
    }
  }
}
1
2
3
// 실행 결과
case 2
case 3
break 없이 사용하는 방법
1
2
3
4
5
6
7
8
9
10
11
12
13
14
15
public class Main {
  public static void main(String[] args) {
    int num = 2;

    switch (num) {
      case 1 -> System.out.println("case 1");
      case 2 -> {
        System.out.println("case 2");
        System.out.println("이런 형식으로도 가능");
      }
      case 3 -> System.out.println("case 3");
      default -> System.out.println("nothing");
    }
  }
}
1
2
3
// 실행 결과
case 2
이런 형식으로도 가능
반복문
while
1
2
3
4
5
6
7
8
9
10
11
12
public class Main {
  public static void main(String[] args) {
    // 변수 선언
    int i = 10;
    // 반복문 while
    // while (조건식) { 반복 할 내용 }
    while (i > 0) { // while(i-- > 0)
      System.out.println(i); // 탈출 조건식이 참이면 실행 할 코드
      i++; // 변수의 증강식
    }
  }
}
1
2
3
4
5
6
7
8
9
10
11
12
public class Main {
  public static void main(String[] args) {
    int i = 0;
    while (i++ < 10) { // 이런 형태도 가능
      if (i == 3) continue; // 빠져나가진 않지만 다음 조건으로

      System.out.println(i);

      if (i == 5) break; // 반복문 탈출
    }
  }
}
1
2
3
4
5
// 실행 결과
1
2
4
5
for
1
2
3
4
5
6
7
public class Main {
  public static void main(String[] args) {
    for (int i = 0; i < 5; i++) {
      System.out.println(i);
    }
  }
}
1
2
3
4
5
6
실행결과
0
1
2
3
4
중첩 for문
구구단 출력을 예제로 작성
1
2
3
4
5
6
7
8
9
10
public class Main {
  public static void main(String[] args) {
    for (int i = 2; i < 10; i++) {
      for (int j = 1; j < 10; j++) {
        System.out.println(i + "*" + j + "=" + (i * j));
      }
      System.out.println();
    }
  }
}
반복문에서의 label
위 예제를 기반으로 설명
1
2
3
4
5
6
7
8
9
10
11
12
public class Main {
  public static void main(String[] args) {
    outter:
    for (int i = 2; i < 10; i++) {
      if (i == 5) continue outter; // if 절 무시하고 중첩 for 문 실행 (구구단 중 5단이 출력되지 않음)
      for (int j = 1; j < 10; j++) {
        System.out.println(i + "*" + j + "=" + (i * j));
      }
      System.out.println();
    }
  }
}
for each
java 가 업데이트 되어가면서 for each 구문을 지원
1
2
3
4
5
6
7
8
9
10
public class Main {
  public static void main(String[] args) {
    String[] numbers = {"one", "two", "three"};

    // for (변수:반복되는 자료구조)
    for (String number : numbers) {
      System.out.println(number);
    }
  }
}
배열
같은 타입의 데이터를 연속된 공간에 나열 각 데이터에 인덱스(index)를 부여
특징
- 같은 타입의 데이터만 저장
- 속도가 빠르다 (메모리상에 고정길이의 크기만큼 차지하기 때문)
- 크기 수정 불가
1
2
3
4
5
6
7
8
9
10
11
12
13
14
15
16
// arraay01.java
public class Main {
  public static void main(String[] args) {
    // 선언
    int[] iarr;
    // 할당
    iarr = new int[5];

    iarr[0] = 10; // java index 는 0 부터 시작
    iarr[1] = 20;
    iarr[2] = 30;
    iarr[3] = 40;
    iarr[4] = 50;
    iarr[5] = 60; // java.lang.ArrayIndexOutOfBoundsException
  }
}
위 배열을 가시적으로 추상적으로 표현하면 아래와 같다 
심화
- 생성과 동시에 초기화
- 반복문을 이용하여 값을 할당하고, 출력
1
2
3
4
5
6
7
8
9
10
11
12
13
public class Main {
  public static void main(String[] args) {
    int[] iarr = new int[5]; // 생성과 동시에 초기화

    for (int i = 0; i < 5; i++) { // 값을 반복문 이용하여 할당 (array01.java) 와 동일한 배열 생성
      iarr[i] = (i + 1) * 10;
    }

    for (int i = 0; i < 5; i++) {
      System.out.println(iarr[i]); // 출력
    }
  }
}
배열의 확장
배열은 확장하여 사용할 수 있다.
int[][] iarr = new int[3][4]; 같은 형태로 생성할 수 있는데, 추상적으로 표현하자면 아래와 같다.
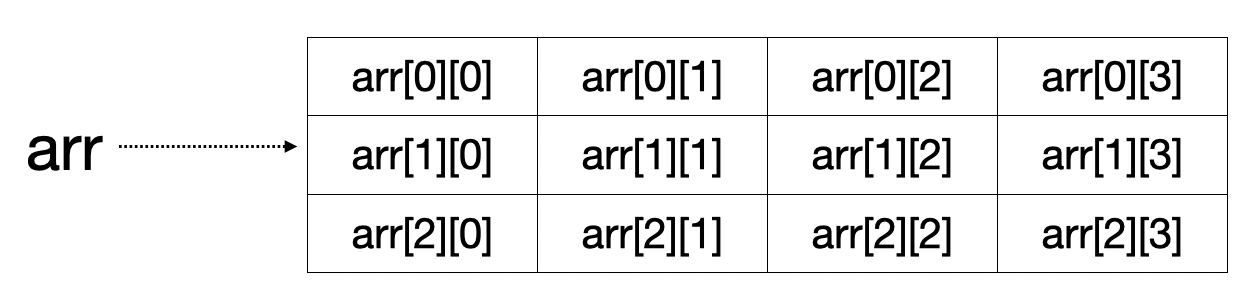
이 이상 차원도 구현은 가능하나, 실제로 많이 사용되지는 않는다. 추상적인 객체의 상태를 인지할 수 있으면 될 것 같다.
클래스와 객체, 인스턴스
기본구조
1
2
3
4
5
6
7
/*
  접근제한자 class 클래스명 {
  필드들;
  생성자들;
  메서드들;
 }
 */
java API 를 활용하여 클래스를 만들고 사용하는 예제
1
2
3
4
5
6
7
8
9
10
11
12
13
14
15
16
17
18
19
20
21
22
23
public class Dice {
  int face;
  int eye;

  public void roll() {
    // 주사위의 face 만큼 눈을 굴림
    // (0부터 시작하기 때문에 1을 더해줌)
    // double 타입으로 반환되기 때문에 int 형으로 변환
    this.eye = (int) (random() * face) + 1;
  }
}


public class DiceUser {
  public static void main(String[] args) {
    Dice dice = new Dice(); // 주사위 생성해서
    dice.face = 6;

    dice.roll(); // 주사위 눈을 굴리고

    System.out.println(dice.eye); // 확인
  }
}
- 위에 있는
java.lang.Math의random()함수는 static 형태로 제공되기 때문에 따로 객체를 생성하지않고 사용가능

생성자
- 객체를 초기화 하는 메서드 > 객체가 생성될 때 딱 한 번 실행
- 리턴타입 없음
- 접근제한자 있음
메시지와 메서드
선언
1
//[접근제한자] [static] 리턴타입 메소드이름 ([매개변수, ...]) {}
클래스와 배열의 활용
1
2
3
4
5
6
7
8
9
10
11
12
13
14
15
16
17
18
19
20
21
22
23
24
25
26
27
28
29
30
31
32
33
34
public class ItemForArray {

  // 필드
  private int price;
  private String name;

  // 생성자
  public ItemForArray(int price, String name) {
    this.price = price;
    this.name = name;
  }

  // 메서드 getter
  // 접근제한자 리턴타입 메서드명(매개변수들..){ ... }
  public int getPrice() { // 함수명은 get[필드명] 형태는 약속
    return price;
  }

  public String getName() {
    return name;
  }

  // 메서드 setter
  // 리턴 값 없음 (void - 예약어)
  public void setPrice(int price) {
    // price = price; // 이렇게 작성하면 어떤 price 값을 가르키는지 모름
    this.price = price; // this 를 이용해 해당 속성을 명시
  }

  public void setName(String name) {
    this.name = name;
  }
}
setter메서드는 일반적으로 외부에서 바꿀 수 없도록 하기 위해 없는 경우 존재
위에 작성한 ItemForArray 클래스 활용
1
2
3
4
5
6
7
8
9
10
11
12
13
14
15
16
17
18
19
20
21
22
23
24
25
26
27
28
29
30
public class Main {
  public static void main(String[] args) {
    ItemForArray[] itemArr;
    itemArr = new ItemForArray[3];

    ItemForArray item1 = new ItemArray(3000, "연필");
    ItemForArray item2 = new ItemArray(5000, "컵");
    ItemForArray item3 = new ItemArray(10000, "공책");

    // itemArr 에 값을 할당
    itemArr[0] = item1;
    itemArr[1] = item2;
    itemArr[2] = item3;

    // 아래와 같이 가격과 상품명을 알 수 있음
    itemArr[0].getPrice();
    itemArr[2].getName();

    // 반복문을 활용해서 클래스 내에 작성 한 getName 메서드를 호출하는 법
    for (int i = 0; i < itemArr.length; i++) {
      System.out.println(itemArr[i].getName());
    }

    // 세 가지를 모두 구매했을 때, 지불해야하는 금액 계산
    int pay = 0;
    for (int i = 0; i < itemArr.length; i++) {
      pay += itemArr[i].getPrice();
    }
  }
}
참고
java 에서는 Arrays Class 에서 다양한 기능 지원
1
2
3
4
import java.util.Arrays;

int[] copyFrom = {1, 2, 3};
int[] copyTo = Arrays.copyOf(copyFrom, copyFrom.length); // copyFrom 의 값을 copyTo 로 복사
java 형 변환에 대해 자세한 내용이 궁금하시면, 이 글을 참고해주세요.
배열 이후부터는 디테일하게 다루고싶기 때문에 필요한 내용들을 위주로 구분해 작성한다.